
I originally made these for a friend who wanted to show off her Jamberry nails while still keeping her hands warm! Hence, the name. She gave me the cutest musical Jams in exchange! Perfect for a music nerd, like me.

Songbyrdy.com – Free Pattern for Jammin’ Fingerless Mittens!
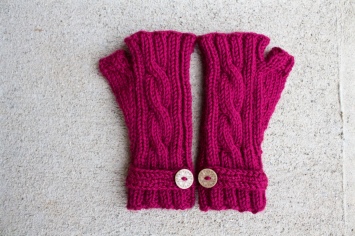
These fingerless mittens have a simple & elegant twisted cable, with 2×2 ribbing all around the mitten, & accented with a strap and button on the wrist. One size fits most (women).
This pattern is for a beginner-intermediate level knitter.
Abbreviations and Techniques Used:
- K (Knit)
- P (Purl)
- Sts (Stitches)
- CO (Cast On)
- BO (Bind Off)
- C6F (Cable 6 Front): Slip 3 stitches to cable needle (CN) and hold in front of the work, K3, K3 from CN.
- Invisible Join In The Round- Knitting.
- Backward Loop Cast-On
- SSK (Slip, Slip, Knit) Slip one stitch as if to knit, slip another stitch as if to knit, put both stitches back on the working needle, knit both stitches through the back loop.
- K2Tog (Knit 2 Together)
- Bind Off in Pattern
- Magic Loop Method (Optional)
- DPNs (Double Pointed Needles)
- K tbl (Knit Through Back Loop)
- P tbl (Purl Through Back Loop)
- M1 (Make 1 Increase) For my M1’s I used these mirrored increases: KLL and KRL and highly recommend them for their ease. You could also use M1R and M1L or whatever increase you choose. I chose KLL and KRL because they leave the least amount of gaps or holes in the fabric near the increase. Obviously, since these are mittens, I want there to be as few gaps in the fabric as possible. M1R and M1L will leave little holes which you might be able to fill in when weaving in yarn tails. If you prefer to use M1L or M1R, there are many explanations of M1R and M1L, but this seems to be the only video that is correct, that I have found. Many other videos confuse the two.
MATERIALS

Palm side
- Worsted Weight Yarn, I used Red Heart Soft, in Grape (to match the Jamberry color!), but most Worsted Weight Yarns will work.
- Size US 8/ 5 mm DPN’s
- Optional Size US 8/ 5mm, 24 in. (at least) circular needles if using magic loop method OR size needed to obtain gauge.
- Cable needle or another DPN.
- 2 Buttons (3/4 in.)
- tapestry needle
- scrap yarn or stitch holder
- stitch markers, if desired (I just use my yarn tail as a guide)
GAUGE
Approx. 17 stitches & 23 rows = 4″ in stocking stitch
Ending measurements: 6″ in length. The continuous ribbing helps these gloves to fit most women’s hands, however, you can easily adjust the width by the number of stitches cast on, in multiples of 4. When adding or subtracting stitches, remember to always keep a ribbed column between the thumb gusset and the cable. Add or subtract the stitches outside the area between the gusset and cable.

Note: I have put all Thumb Gusset stitches in [ ] to identify them more clearly.
PATTERN
- CO 40 sts (I used a standard long-tail cast-on)
- If using DPN’s, split the sts evenly between 3 or 4 needles (your preference). Being careful not to twist the stitches. If using Magic Loop Method, split the stitches in half (20 on each needle).
- Join the round using your preferred method. My preferred method is an invisible join: CO 1 extra stitch, Slip the 1st stitch from left needle over to the right needle & bind off this stitch using the extra cast-on stitch. Pull the tail and working yarn tight. Put the 1st stitch back on the the left needle, and you’ve successfully joined the round. Note: If you are using the magic loop method, I suggest using 2 DPNs to help cast off the extra stitch by placing the extra cast-on stitch and the stitch from the left needle onto one DPN, then use the other DPN to cast off the extra stitch, then return the left-needle stitch back to the left needle (don’t forget to tighten by pulling on the tail and working yarn). Here is an excellent video demonstration by newstitchaday.com: Invisible Join In The Round- Knitting.
CUFFS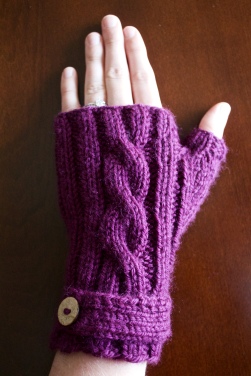
Begin 2 x 2 ribbing of K2, P2 until the end of the round.
Do this for 15 rounds, (2.5″ or 6.3 mm) or to your desired cuff length.
BODY (Right Mitten)
- K2, P2, Begin Thumb Gusset Increases by [M1 (or KRL), K2, M1 (or KLL)], P2, *K2, P2, Repeat from * 5 more times, K6 (to begin cable panel), P2.
- K2, P2, [K4], P2, *K2, P2, Repeat from * 5 more times, C6F, P2.
- K2, P2, [K4], P2, *K2, P2, Repeat from * 5 more times, K6, P2.
- Repeat Round 3.
- K2, P2, [K1, M1, K2, M1, K1], P2, *K2, P2, Repeat from * 5 more times, K6, P2.
- K2, P2, [K6], P2, *K2, P2, Repeat from * 5 more times, K6, P2 .
- Repeat Round 6.
- Repeat Round 6
- K2, P2, [K1, M1, K4, M1, K1], P2, *K2, P2, Repeat from * 5 more times, K6, P2.
- K2, P2, [K8], P2, *K2, P2, Repeat from * 5 more times, K6, P2.
- Repeat Round 10.
- K2, P2, [K8], P2, *K2, P2, Repeat from * 5 more times, C6F, P2.
- K2, P2, [K1, M1, K6, M1, K1] P2, *K2, P2, Repeat from * 5 more times, K6, P2.
- K2, P2, [K10], P2, *K2, P2, Repeat from * 5 more times, K6, P2.
- Repeat Round 14.
- Repeat Round 14.
- K2, P2, [K1, M1, K8, M1, K1], P2, *K2, P2, Repeat from * 5 more times, K6, P2.
- K2, P2, [K12], P2, *K2, P2, Repeat from * 5 more times, K6, P2.
- Repeat Round 18.
- Repeat Round 18
- K2, P2, [K1, M1, K10, M1, K1], P2, *K2, P2, Repeat from * 5 more times, K6, P2.
- K2, P2, [K14], P2, *K2, P2, Repeat from * 5 more times, C6F, P2.
- K2, P2, [Slip the 14 gusset stitches to a stitch holder, or with a tapestry needle, draw scrap yarn through the stitches and tie to hold], CO 2 stitches (I used a Backward Loop Cast-On), P2, *(K2, P2), Repeat from * 5 more times, K6, P2.
- K2, P2, K2 tbl, P2, *K2, P2, Repeat from * to end of round (no more cable).
- (K2, P2) around.
- Repeat Round 25 for 5 more rounds or until desired length.
BO in pattern. Weave in ends.
BODY (Left Mitten)
(UPDATE 12-14-15: If you’d like your left mitten’s cable to mirror the cable on the right mitten, simply C6B, instead of C6F on rows 2, 12, and 22. This is your personal preference. You will probably be the only one who notices!)
- K2, P2, Begin Thumb Gusset Mirrored Increases by [M1 (or KRL), K2, M1 (or KLL)], P2, K2, P2, K6 (to begin cable panel), P2, *K2, P2, Repeat from * 4 more times (or until end of round).
- K2, P2, [K4], P2, K2, P2, C6F, P2, *K2, P2, Repeat from * 4 more times,
- K2, P2, [K4], P2, K2, P2, K6, P2, *K2, P2, Repeat from * 4 more times.
- Repeat Round 3.
- K2, P2, [K1, M1, K2, M1, K1], P2, K2, P2, K6, P2, *K2, P2, Repeat from * 4 more times.
- K2, P2, [K6], P2, K2, P2, K6, P2, *K2, P2, Repeat from * 4 more times.
- Repeat Round 6.
- Repeat Round 6.
- K2, P2, [K1, M1, K4, M1, K1], P2, K2, P2, K6, P2, *K2, P2, Repeat from * 4 more times.
- K2, P2, [K8], P2, K2, P2, K6, P2, *K2, P2, Repeat from * 4 more times.
- Repeat Round 10.
- K2, P2, [K8], P2, K2, P2, C6F, P2, *K2, P2, Repeat from * 4 more times.
- K2, P2, [K1, M1, K6, M1, K1] P2, K2, P2, K6, P2, *K2, P2, Repeat from * 4 more times.
- K2, P2, [K10], P2, K2, P2, K6, P2. *K2, P2, Repeat from * 4 more times.
- Repeat Round 14.
- Repeat Round 14.
- K2, P2, [K1, M1, K8, M1, K1], P2, K2, P2, K6, P2 *K2, P2, Repeat from * 4 more times.
- K2, P2, [K12], P2, K2, P2, K6, P2, *K2, P2, Repeat from * 4 more times.
- Repeat Round 18.
- Repeat Round 18.
- K2, P2, [K1, M1, K10, M1, K1], P2, K2, P2, K6, P2, *K2, P2, Repeat from * 4 more times.
- K2, P2, [K14], P2, K2, P2, C6F, P2, *K2, P2, Repeat from * 4 more times.
- K2, P2, [Slip the 14 gusset stitches to a stitch holder, or with a tapestry needle, draw scrap yarn through the stitches and tie to hold], CO 2 stitches (I used a Backward Loop Cast-On), P2, K2, P2, K6, P2, *K2, P2, Repeat from * 4 more times.
- K2, P2, K2 tbl, P2, *K2, P2, Repeat from * to end of round (no more cable).
- (K2, P2) around.
- Repeat Round 25 for 5 more rounds or until desired length.
BO in pattern. Weave in ends.
THUMB GUSSETS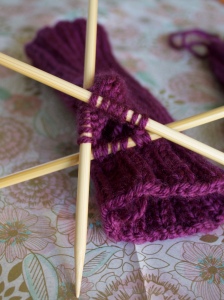
Pick up the gusset stitches (here’s great tip for avoiding holes when picking up stitches for the gusset) as you slowly remove the scrap yarn and…
- Split the 14 gusset sts between two DPNs: 6 sts on the 1st needle, 8 sts on the 2nd needle.
- With the third DPN, carefully pick up two stitches between the 14 gusset sts and the 2 cast-on sts (pick sts that will not create large holes).
- Pick up the 2 cast-on sts through the right legs of the sts,
- Then, carefully pick up two more sts between the gusset sts and the two cast-on sts. You should have 6 sts on the third DPN.
- You should now have a total of 20 sts for the thumb gusset.
Starting with the first DPN, and using a new strand of yarn (leave a long tail):
- K1, SSK, K8, K2Tog, K1, K2Tog, K2, SSK. 16 sts.
- K16.
- K1, SSK, K6, K2Tog, K1, K2Tog, SSK. 12 sts.
- (K2, P2) around.
- Repeat round 4.
- Repeat round 4.
BO (loosely) in pattern. Leave a long tail, weave in tail and close up any gaps between the body and the gusset.
STRAPS (Make 2)
Leaving a long tail, CO 6 sts. You will need the tail to sew on the strap. See update below for a strap with less curl.
- (RS) S1 knit-wise, K4, K1 tbl.
- (WS) S1 purl-wise, P4, P1 tbl.

UPDATE 12-12-15:
I re-made the strap to have less curl, but I’ll leave the old one up there, in case you are already making your gloves:
- (WS) S2 purl-wise, P2, P2 tbl.
- (RS) S2 knit-wise, K2, K2 tbl.
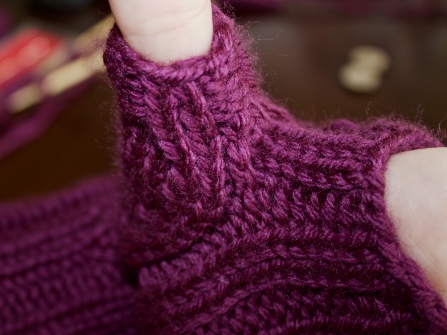
Repeat rows 1 & 2, alternating until you have 24 rows (or to your desired length). BO, leave a tail. Use tails to sew ends of strap onto mitten between the K2 columns outside the cable panel (or wherever you desire) about 1/2″ from the bottom of the mitten. See photo for detail. Sew on 3/4″ /18mm buttons on outer edge of wrist straps, if desired. Weave in any remaining ends.
© Whittney Perez, 2015
You may use this pattern for personal use, you may sell products made from this pattern, as long as you attribute the pattern to songbyrdy.com and provide a link to the pattern. You MAY NOT sell this pattern. This pattern is provided FREE, as long as it is not abused, so share the love! 🙂
If you have suggestions for improving this pattern, or have made adjustments, please share the love in the comments below! Thank you!
Don’t want to DIY? You can purchase these fingerless mittens here or by visiting songbyrdy.etsy.com

Hi! I’m knitting these right now, thank you for such a thorough pattern! I just got to the body of the right mitten and the pattern is for 36 stitches, not the 40 you suggested casting on. I’m assuming this is an oversight? I just did 6 (k2, p2) instead of 5 to correct it.
LikeLiked by 1 person
Hi Stephanie! Make sure you knit the instructions in the parentheses FIRST, then repeat it 5 MORE times, for a total of 6 times. Does that help? You are doing it correctly!
LikeLike
Please have you instructions using straight needles, I just can’t manage dpns or circular… arthritis and carpal tunnel make it very hard..cheers
Margaret
LikeLike
Love these mitts! Cast on right away, but stuck on r17. In the middle of the M1s, it says ‘knit 18’. If I do that, will lose ribbing pattern. Any help would be greatly appreciated – trying to get these done (2 pair even!) for Christmas!!
LikeLiked by 1 person
Oopsy! Thank you for pointing that out! It was supposed to say K8, not K18!! I have corrected it in the pattern!
LikeLike
Thanks for getting back to me! In previous row 14, there are 10 stitches in the gusset, so should r17 be K10? That would match with r.18, which says to K12 (the previous 10 plus the 2 you made], which then makes r21 a K12 (not K10) in the middle of the gusset, which makes it match r22 gusset of K14. Wow – hope that made sense… Again, it’s just a lovely pattern and can’t wait to keep working on it! Thanks so much – Kelly
LikeLiked by 1 person
No, that would be incorrect. Add up the stitches inside the [ ] to get 12 total gusset stitches in Rows 17-20. For example, in R17, [K1 + M1 + K8 + M1 + K1] = 12. The pattern is correct. I put the M1’s in between Knit stitches to prevent holes that would result if they were placed in between a purl stitch and a knit stitch.
LikeLike
you’re the best! Thanks for your patience toward my poor pattern reading skills 🙂 Now I can knit on!! – Kelly
LikeLiked by 1 person
You can do it! Your second pair will go much faster than the first!
LikeLike
Thank you; I knit for charity and these mitts will go into my roation!
LikeLike
I am having such a wonderful time knitting these “texting” gloves! Am working on left one now. Will be making SEVERAL for Christmas gifts this year! Love the easy instructions and appreciate the video of M1. That’s a new stitch I’ll be using often now. Thanks bunches!
LikeLike